Granite is a granular synthesizer particularly capable at generating evolving, organic textures, atmospheres and soundscapes. However, Granite offers a vast range of transformation possibilities, and can generate a wide range of sounds and extensively processed loops.
Featuring a compact and intuitive interface, and an engaging workflow including innovative Motion Recorders recorders and Cycle Modulators, Granite can operate as a free-running sound generator, or as a playable MIDI instrument. Virtually all parameters can be controlled via MIDI CC and host automation.
If I should classify and characterize the us, you and me, and all others of the "sonic grains and microsound scene", I would name the following 4 groups of people:
the audiophile sensualist, .
the serious sound designer, .
the composer of contemporary sonic art, .
the sound analyst.
You may well belong to more than one of these groups though.
Granite serves at least the first 3 of these groups. It is a powerful, but easy to use application to granulize either the factory samples of any soundfile of your own. Let me talk about some details now:
Whereas CrusherX offers an enormous amount of tools to reach deep into the details of granular sound processing, Granite is an agent of a different philosophy.
New Sonic Arts have bundled several groups of functions under the hood of Granite, and offer (macro-)knobs to the user. Each these knobs represents a certain one of these bundles of functions. These (macro-)knobs tweak all of the functions in the bundle, which they stand for at the same time. New Sonic Art has coded the underlying algorithms in a way, which allow for maximum musical usefulness, but prevent the user from creating too much of harshness.
Just an example: We cannot directly set the length of the grains, but we can set the DENSITY. Together with another (macro-)parameter, SPACE, we indirectly influence the length of the grains, but what we really adjust is the sonic result (how "dense" the piece of sound reaches out ears), and Granite's algorithms under the hood take care, that all needed details (i.e. grain length) are set to serve our wishes best.
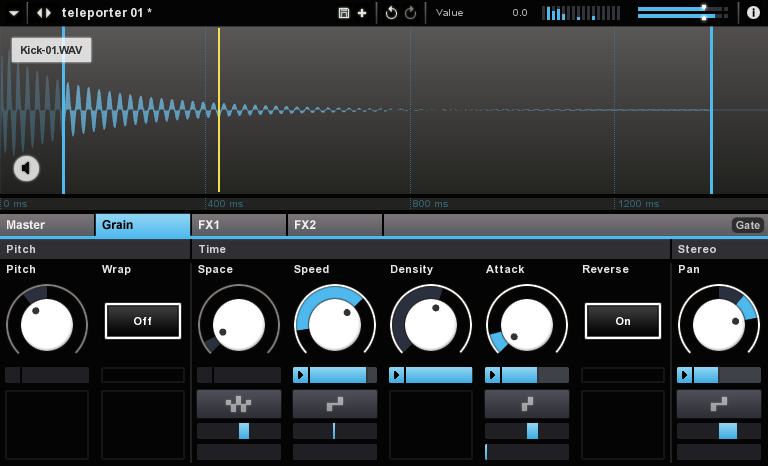
There are 6 of these (macro-)parameters concerning the grains themselves, amd the process of generating and shaping them.
There are 12 FX parameters, and 3 Master parameters.
Granite cannot work on live sound. You need to load the sound you're going to work on with Granite into its buffer. This buffer is static in the meaning, that sound cannot stream through it.
Both apps, CrusherX as well as Granite, are wonderfully precise in dealing with the samples in their buffers. Scanning through a piece of sound happens at a resolution of a millisecond. Because of the large waveform display and its zoom functionality it is very comfortable to "walk" (scan) through the sound in the buffer with Granite, even if Granite's waveform display doesn't deliver that amount of information, that you get from the Grainview window with CrusherX. Not surprising, because there are not that much detailed parameters to get adjusted by the user with Granite (as I mentioned before). And also in resampling the loaded sound Granite delivers a brilliant performance.
There are not that many different methods of modulating Granite's parameters (all in all only 5), but we can adjust and combine them with the same precision and flexibility as we can with CrusherX.
Granite offers a very comfortable file handling and preset management, as well as a multilayer undo/redo history. The manual is quite meager, but there is a great comprehensive video tutorial on YouTube (by Dan Reynolds). You'll find the link in the Resources chapter. And with that said it's time to look at some functions in detail.
SPACE sets the time between generating consecutive grains. With the knob turned to the left the time between the "birth" of consecutive grains is short (some very few milliseconds), the frequency of generating grains is high. With the knob turned to the right it's opposite: long periods of time between generating of consecutive grains (more than a minute). But the real sonic result is different from the graphic. I'm going to explain this in a second, when I talk about the DENSITY parameter.
In the upper right corner of the GUI we can follow how many grains are generated and how often the generating happens.
SPACE teams up with another parameter, the DENSITY parameter. Both determine in cooperation (together with these "algorithms under the hood") how long the generated grains are. the term density means (in simple words) how many grains are active (heard) at the same time. With Granite the DENSITY knob sets the relation of grain length and the space between consecutive grains. With the knob turned to the left the length of each grain covers exactly the time between generating consecutive grains, which I have set with SPACE.
But turned more and more to the right the length of the grains gets longer and longer, which results in more and more overlapping grains (as long as I don't increase the SPACE parameter). It needs some experiments of your own to take in this concept, and to be able to work with these parameters fast and intuitively.
We cannot have long silent breaks between two consecutive grains, because the lowest possible density is "1", meaning one grain at a time. Only the grain window, the overall volume envelope of a grain lets us recognise the seam between two grains.
The impression of the highest density can be generated by adjusting the shortest grain generating space and the highest density (which means the highest load on CPU as well, because a lot of grains are generated at the same short time, while the playhead is scanning through the sound in the buffer).
The SPEED parameter sets the speed of the playhead on its way through the buffer. This parameter is the equivalent to CrusherX's delay modulation, and determines the length of the piece of sound heard without changing the pitch of the sound.
Well, and PITCH is the opposite: it changes the pitch of the sound without changing its length. Granite's PITCH parameter is the equivalent to CrusherX's speed parameter. Take care, when working with both apps at the same time.
The ATTACK parameter determines the shape of the grain window by setting the relation between attack-time and release time of the grain's volume envelope.
There is a paramter called SHAPE. It's not one of the grain parameters, but located in the FX1 panel. SHAPE is helpful when working with "critical" sounds, meaning with the huge amplitude differences, which we meet quite often when working with grains containing transitions (see chapter 5). SHAPE raises the volume of quieter parts in the sound.
For details concerning chord playing (WRAP), reverse playback (REVERSE) and panorama (PAN), as well as concerning the MASTER section with overall attack, overall release and velocity please read the manual (link in the Resources chapter), or watch the recommended video by Dan Reynolds.
Let me only mention, that Granite comes with a distortion function, sample rate reduction (kind of low-fi function), and an LP, BP and HP filter, all in the FX1 panel.
The FX2 panel houses the reverb unit (a very nice sounding velvet-like reverb, by the way) with parameters to set the room size, the decay time of the reverb and its low-how balance.
Instead of talking about the details of all of these quite common FX functions, I'll rather talk about modulation and real-time parameters now.
To modulate a parameter we click in the ring, that surrounds every parameter knob and drag the blue modulation pointer to and fro according to our needs. All of these movements are automatically recorded, and as soon as we release the mouse button, the drawn modulation starts repeating. until we draw another one or until we right click in the modulation ring to reset it back to no modulation at all. The direction, the amount and the speed, that we drew in is recorded and repeated. With the parameter knob I set the offset around which the drawn modulation takes place. Just click the link to the video to see what I mean.
Another way to – or an additional one – to modulate a parameter is to use the LFO panel below the parameter's knob. The upper of the three little LFO sliders determine the waveform of the LFO (i.e. sine), the slider in the middle determines the amount and the direction of the modulation, and the slider at the bottom sets the speed of the modulation (the rate of the LFO), with high LFO speeds if set to values on the left, and slow ones with the blue slider drawn to the right.
And again: the modulation offset is determined by the parameter's knob.
Both kinds of modulation and the parameter's offset add to each other, which allows for quite complex modulation structures.
I can set the part of the sample to be played back with the two blue bars in the sample display. The position of these borders can be modulated too. The system is the same as with the modulation ring:
I click on the little red arrows on top (left and right) of the blue border bars and drag the bars to and fro acros the sample. These movements are recorded and repeat after releasing the mouse button.
Together with the SPEED parameter (the speed of the playhead shown as a yellow bar) there are quite complext walks through the sample possible, same as sudden jumps and other kinds of changing the part of the sample to be played back.
Read ReviewReviewed By Reaktor Hunter [all]
February 9th, 2014
Version reviewed: 10.9.1 on Mac
It will be short. A time ago I was inspired by some people's enthusiasm relating to granular synthesis. So I decided to dive in that area and Ive found out that theres almost no "Grand"-products on the market. When you're looking for some information on the most popular products, you are usually addressed to very experimental projects like CDP (composers desktop project), which is actually a very complex product, so IMO definitely not the first one to learn get used to the granular synthesis mechanism. On occasion Ive found Granite, diving deeper in demo version left me no doubt, it is a thing to have. A swiss-army-knife of granular in a very simple form. Its a pleasure to use it. The developer deserves support, everything is beautiful and effective. Nothing to say more, you better go check it.
Read Review
Please log in to join the discussion
Submit: News, Plugins, Hosts & Apps | Advertise @ KVR | Developer Account | About KVR / Contact Us | Privacy Statement
© KVR Audio, Inc. 2000-2024
