2 KVR members have added E-Compressor600 to 2 MyKVR groups 2 times.
Download KVR Studio Manager (FREE)
An advanced JSFX compressor plugin for REAPER that offers:
* Two Compression Modes:
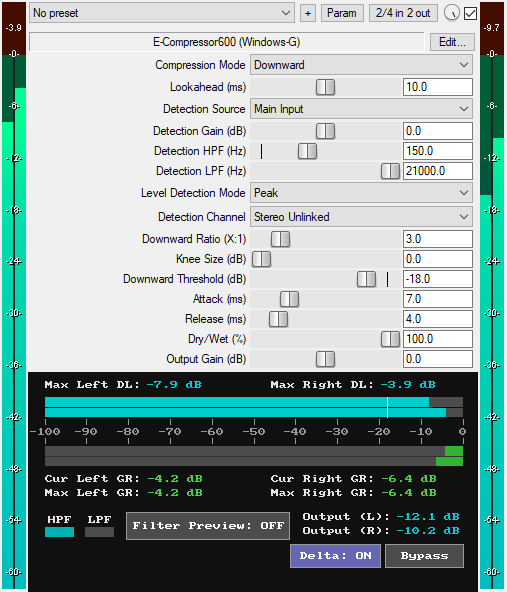
1. Downward Compression: Traditional downward compression that reduces gain of signals above the threshold based on the downward ratio (reduces loud signals).
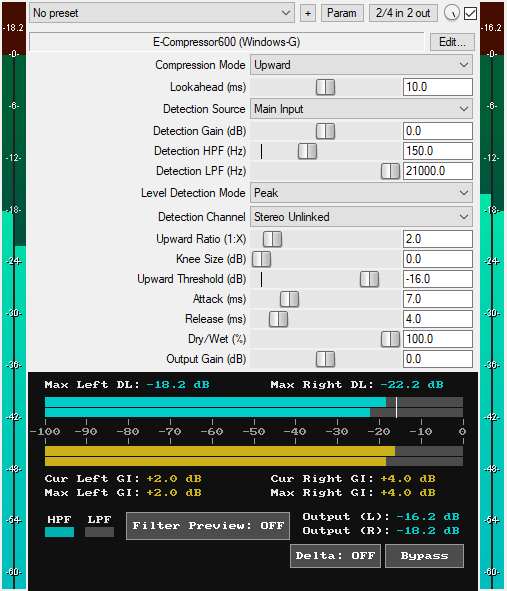
2. Upward Compression: Increases gain of signals below the threshold based on the upward ratio (boosts quiet signals).
* Lookahead Control (0 ms to 20 ms): Controls the lookahead time of the compressor in milliseconds. Lookahead delays the main track's audio slightly to let the compressor analyze the audio ahead of time and respond before the transients arrive. Without lookahead, even at fast attack settings, the first few milliseconds of each transient can pass through uncompressed before the compression engages. Lookahead ensures that the initial attack of transients does not escape compression. The latency it introduces is reported to the DAW for automatic delay compensation. Turn lookahead off by setting the control to 0 ms.
* Two Detection Source Modes:
1. Main Input: The compressor uses the main track's audio for both detection and dynamic processing.
2. Sidechain Input: The compressor listens to external sidechain input for detection while applying compression to the main track's audio.
* Detection Gain (-30 dB to +30 dB): Boosts or attenuates the level of the detection signal only (it does not affect the main track's level). This is useful for ensuring the detection signal is at the optimal level to trigger the compressor.
* Detection HPF (10 Hz to 20 kHz): A 12dB/oct high-pass filter that removes low frequencies from the detection signal. This is useful for preventing unwanted low-frequencies from falsely triggering the compressor. The filter becomes active only when the frequency is set above 10 Hz.
* Detection LPF (20 Hz to 21 kHz): A 12dB/oct low-pass filter that removes high frequencies from the detection signal. This is useful for preventing unwanted high-frequencies from falsely triggering the compressor. The filter becomes active only when the frequency is set below 21 kHz.
* Two Level Detection Modes:
1. Peak: Makes the compressor respond to instantaneous peak levels in the detection audio. This mode is ideal for audio requiring fast compression like drums or percussion.
2. RMS: Uses Root Mean Square calculation to make the compressor react to the average power of the detection audio over a time window. This makes the compressor less responsive to instantaneous peak levels. This mode is ideal for audio requiring slower, smoother compression like pads, piano or other sustained sounds.
* RMS Window (1 ms to 1000 ms): Only active in RMS mode. It defines the time window for RMS averaging and determines how averaged the RMS level is. Shorter windows (1 ms to 140 ms) make the compressor react quickly to changes in peak level, longer windows (400 ms to 1000 ms) make the compressor react very slowly to changes in peak level, while medium windows (150 ms to 390 ms) offer a middle ground between fast and slow compression.
* Four Detection Channel Modes:
1. Stereo Linked: Makes the compressor dynamically react to the loudest of the left and right channels, applying the same gain reduction/increase to both channels. This mode is ideal when you want to maintain the stereo image of the audio.
2. Stereo Unlinked: Makes the compressor react independently to each channel's signal level, applying different gain reduction/increase to left and right channels. This mode can alter the stereo image but can sound very natural and musical as some instruments are naturally independently expressive in the left and right channels.
3. Left Only: Makes the compressor react only to the signal levels from the left channel, and applies the same gain reduction/increase to both channels. This is useful when the detection signal is panned to the left.
4. Right Only: Makes the compressor react only to the signal levels from the right channel, and applies the same gain reduction/increase to both channels. This is useful when the detection signal is panned to the right.
* Downward Ratio (X:1, range 1 to 100): Only visible in downward compression mode. Controls how much gain reduction is applied to signals above the threshold. A ratio of 1.0:1 provides no compression, 2:1 to 4:1 provides gentle compression, 5:1 to 10:1 provides moderate to strong compression, while very high ratios approach limiting behavior.
* Upward Ratio (1:X, 1.0 to 100): Only visible in upward compression mode. Controls how much gain increase is applied to signals below the threshold. A ratio of 1.0:1 provides no upward compression, 1.5:1 provides gentle upward compression while higher ratios provide more dramatic gain increase to quiet signals.
* Knee Size (0 dB to 30 dB): Controls the smoothness of the transition into compression around the threshold. A knee size of 0 dB provides hard-knee compression with an immediate onset of compression at the threshold. Higher knee values provide soft-knee compression that starts before the threshold and completes after it, resulting in more gradual gain reduction/increase compared to knee at 0.
* Downward Threshold (-100 dB to 0 dB): Only visible in downward compression mode. Displayed as a white line on the detection level meter. This is the threshold that determines when downward compression occurs. Signals above this threshold are reduced in level based on the downward ratio.
* Upward Threshold (-100 dB to 0 dB): Only visible in upward compression mode. Displayed as a white line on the detection level meter. This is the threshold that determines when upward compression occurs. Signals below this threshold are increased in level based on the upward ratio.
* Attack (1 ms to 500 ms): In downward compression mode, it controls how fast the compressor reduces gain when the detected signal exceeds the threshold. Fast attack time (1 ms to 14 ms) allows the compressor to catch transients and peaks quickly, medium attack time (15 ms to 34 ms) lets transients through a bit before the compressor engages, while slower attack time (35 ms to 500 ms) allows a large portion of the transients to pass through unaffected before compression engages. In upward compression mode, it controls how fast the compressor increases gain when the detected signal drops below the threshold. Fast attack (1 ms to 14 ms) quickly boosts quiet signals, slower attack (35 ms to 500 ms) creates a gradual gain increase, while medium attack (15 ms to 34 ms) provides a middle ground between very fast gain increase and gradual gain increase. The attack uses an exponential curve for smooth compression.
* Release (1 ms to 2000 ms): In downward compression mode, it controls how fast the gain reduction returns to unity after the detected signal drops below the threshold. Fast release (1 ms to 14 ms) creates quick recovery which is good for preserving punch on drums, while slow release (70 ms to 2000 ms) makes the gain reduction return toward unity at a slow pace which is ideal for sustained sounds or for creating "glue" in mixes. Medium release (15 ms to 69 ms) provides a middle ground between fast and gradual recovery. In upward compression mode, it controls how fast the increased gain returns to unity after the detected signal rises above the threshold. Fast release (1 ms to 14 ms) creates fast drop in gain which is ideal when increasing only room ambience, while slow release (15 ms to 2000 ms) makes the gain increase return toward unity at a slow pace which is ideal when increasing other instruments in addition to ambience or reverb. Be cautious, as slow release in upward mode can cause excessive gain increase and audible pumping. The release uses an exponential curve for smooth compression.
* Dry/Wet (0% to 100%): Controls the mix between the original (dry) signal and the compressed (wet) signal, ranging from 0% (fully dry) to 100% (fully wet). This is useful for parallel compression.
* Output Gain (–30dB to +30dB): Sets the final output level of the compressed signal only. This control does not affect the detection signal level.
* Filter Preview ON/OFF (Button): When turned ON, it solos the output of the detection high-pass and low-pass filters, allowing the user to hear the exact signal being used to trigger the compressor. This is useful when tweaking the filters to isolate the desired trigger frequency. It is available for automation as "Filter Preview" in the plugin's parameter list.
* GUI Delta Button: Solos the difference between the wet and dry signals. Based on the compression mode, it lets you hear what the compressor removed or added to the main signal. This is very useful when adjusting settings. Available for automation as "Delta (Smooth)" in the plugin's parameter list.
* GUI Bypass Button: A smooth bypass button for toggling the compression effect on or off without audio clicks. Available for automation as "Bypass (Smooth)" in the parameter list.
* GUI Detection Level Meter: Displays the current detection signal levels on a -100 dB to 0 dB scale. The white line represents the threshold.
* GUI Gain Reduction/Output Level Meter: In downward compression mode, it displays the current amount of gain reduction being applied by the compressor with a green fill. In upward compression mode, it displays the output level after gain increase with an orange fill. The orange fill accounts for the dry/wet and output gain, so changes in these two parameters will reflect in the meter.
* GUI Max Left/Right DL Readouts (dB): Display the maximum detection signal levels for left and right channels since playback started. The values automatically reset when detection parameters change.
* GUI Cur Left/Right GR Readouts (dB): Display the current amount of gain reduction being applied by the compressor to left and right channels.
* GUI Max Left/Right GR Readouts (dB): Display the maximum gain reduction applied to left and right channels since playback started.
* GUI Cur Left/Right GI Readouts (dB): Display the current amount of gain increase being applied by the compressor to left and right channels.
* GUI Max Left/Right GI Readouts (dB): Display the maximum gain increase applied to left and right channels since playback started. The values automatically reset when compression parameters change.
* GUI L/R Output Max Readouts (dB): Display the maximum output levels reached for left and right channels since playback started. The value automatically resets on each playback start. You can also click on the readouts to reset them.
* GUI HPF/LPF Status Indicators: Show the active/inactive status of the detection high-pass and low-pass filters.
* Zipper-Noise-Free Operation: Advanced interpolation ensures no zipper noise during slider automation or real-time adjustments.
* Minimal CPU Usage
You can grab it for $14. All future updates are free, just make sure to use a valid email so I can send future updates to you.
Listen to the audio demos here or on the Gumroad product page to hear what the plugin can do.
Email Support: info.windowsg@gmail.com
==================================================
Using This JSFX Plugin in Other DAWs:
If you want to use this JSFX plugin in other DAWs, you can do so using the open-source YSFX plugin.
YSFX is available in VST3, AU, and CLAP formats for Windows, macOS, and Linux.
Download your preferred version of YSFX from here (Click on "Assets" for the downloads to appear):
https://github.com/JoepVanlier/ysfx/releases
YSFX comes in two versions:
* ysfx-s FX (for JSFX effects).
* ysfx-s instrument (for JSFX instruments).
1. Open ysfx-s FX in your DAW,
2. Then click "Load", find your "E-Compressor600_Windows-G" file, and click "Open."
The JSFX plugin will now run inside the YSFX host, working perfectly in any DAW that supports VST3, AU, or CLAP plugins.

Please log in to join the discussion
Submit: News, Plugins, Hosts & Apps | Advertise @ KVR | Developer Account | About KVR / Contact Us | Privacy Statement | Sell @ KVR | KVR Marketplace Terms & Conditions
© KVR Audio, Inc. 2000-2026
